Showing posts with label trellis. Show all posts

Friday, June 13, 2014

Easy Peasy Trellises

IMG_3245 IMG_4246 IMG_4247 IMG_4245

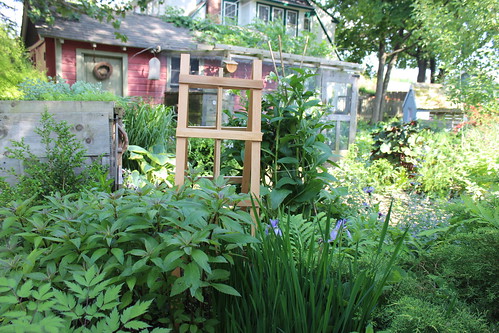
With a small property but a big desire to grow a large variety of plants, I need to be creative with my space. Growing plants vertically, especially the vining type is a great way to utilize space. Trellises get plants up off of the ground preventing rot as well as being nibbled on by insects and creatures plus you’ll get help from bug-eating birds that use trellises as hunting perches.
Disease problems are minimized because plants receive better air circulation. Harvesting is easy and crops stay cleaner because they are suspended above the soil surface.

This year I am growing as many cucumbers as possible since it is a favorite in our home. Not only do I love the look of edibles growing in harmony with my ornamentals but I love how the trellises create height, texture and a sculptural presence in the garden.

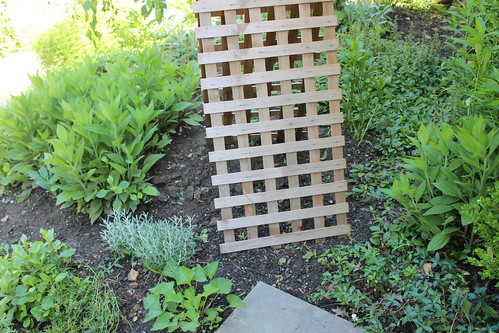
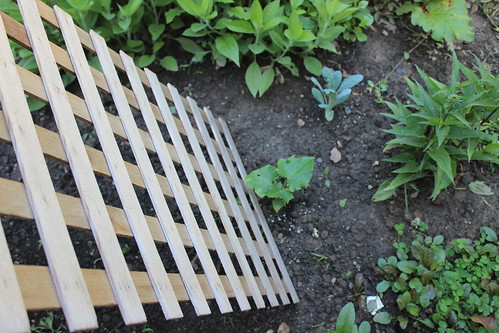
The trellises shown above are very simple to make and affordable too. With just a few pieces of lattice found at your local garden or hardware store and some wire you can have a handmade trellis in a matter of minutes.

My pieces of trellis were cut to 40"X20" and wired together at the top to create an A-frame structure.

I placed one in the back garden in part shade and one up front in full afternoon sun. It's a race to see who will win and produce the first cucumber of the season!

Wednesday, April 24, 2013

building a trellis & planting peas!


we spent a lot of time in the garden this past weekend, and it was just what i needed. we (luke) are adding double-dug, biointensive beds to our backyard so it has been a fairly slow start for us. 

-----
below is luke's go-to book on the topic. (luke was able to participate in a biointensive workshop with john jeavons last november! i'm pretty sure it's a tie between jeavons & katz for luke's personal hero!):


------

on sunday, we finally got around to planting our sugar snap peas. luke started our sugar snaps early in soil blocks so we could have a head start when planting.


we made our trellis with dried bamboo, chicken wire & string. a very simple structure with supplies from our garage. there are several different ways to make a trellis. you can look at my gardening pinterest boards for more ideas!


we measured the bamboo so it was evenly spaced & pressed the sticks into the soil until they were all secure & sturdy. 

we measured out the chicken wire, wrapped it around the bamboo on both ends & tied. we did this twice to make an extra tall trellis.


we tied the chicken wire together to make sure it was secure.


using four inch spacing, we planted our sugar snap pea starts.


a satisfying & easy project. i am looking forward to a harvest or two of sugar snaps for fresh eating in salads!

Thursday, March 29, 2012

This year's sugar snap trellis


Last year we used the dried okra stalks left in the ground as a natural trellis for the new sugar snaps. That method worked up to a point but then the sugar snaps grew too large for the okra stalks to support them. So this year we are trying something else. With some leftover wire fencing and wooden stakes we built a trellis that looks like my drawing (below). To do this, drive the wooden stakes into the ground and then secure the fencing to the stakes either by wrapping the edge of the fence around the end posts or staple or tie it to the stakes.


Most of the stakes we used are T shaped because we then drape a netting over the entire bed to keep out the birds. The house sparrows around here really like to eat the tender leaves.
There's lots of ways to make a trellis. Do you grow sugar snaps? What trellis method do you like?

Tuesday, August 9, 2011

trellising melons


as a gardener with a small backyard, i believe in trellises. instead of sprawling cantaloupe & watermelon vines throughout the yard, my melons grow up a homemade trellis made from bamboo & thick twine.

at first i was hesitant, though. i thought that maybe the melons would grow to be too heavy for the trellis, hanging in mid air & snapping from the vine before fully ripening. this has not been the case for this year's melons.


they are growing healthfully & happily. using what i had, (in this case a thin, stained kitchen towel did the trick) i tied the watermelon to the trellis. this allows for more support for the vine & trellis. i have also used plastic produce bags & have heard of others using old panty hoses.


whatever you might choose to use, i think you will really enjoying this space-saving trick. i am convinced that this will be my only way of growing melons in my little backyard, and perhaps pumpkins, too.

Tuesday, June 14, 2011

raised bed gardening


we moved & are settling into our new home on the arkansas-oklahoma border. the first goal of our new home was to build raised beds. with some untreated wood, tools & a little elbow grease, we built four garden beds. we used the mu extension publication as our guide. (by the way, if you haven't connected with an extension office near you, i highly recommend it. they have a wealth of knowledge & are paid to help you!)


with our small amount of space, we used every inch of growing room-

planting shade-loving swiss chard in between tomato plants


& building trellises for squash & cucumber to climb (for this trellis, we used bamboo & gardening twine).


we are making progress in this bare yard, one step at a time.

what are some of the ways you use your garden space efficiently?

Wednesday, June 8, 2011

vertical growing

pea trellis

basket of chard (and calendula)

hanging cans

to maximize my growing space (when i grow up, i want to be like amy!), i'm doing my darndest to grow as many plants as possible vertically this year.  here are a few of my new vertical growing methods.

the first is a pea trellis that i constructed out of salvaged branches and some twine.  i tied the three branches together at the top and then ran a line of twine around the bottom between each branch. i then took about 4-6 pieces of twine on each "side" of the trellis and tied it from the top point to the line at the bottom.  pretty easy.  those peas are climbing up like gangbusters, can't wait for them to start producing!

the second is a simple hanging basket with two chard plants and one calendula plant. i have a couple other hanging baskets this year, but i need to get some more brackets to hang them from.  hanging baskets are a great way to save space, but remember to water them regularly as they tend to dry out pretty quickly.

the last of my vertical growing adventures (so far!) is the one i'm most proud of.  i came across this photo earlier in the spring, which was the inspiration for it, and later realized that there is also a similar photo in you grow girl.  i salvaged these large tomato and tuna cans from my neighborhood cafe's recycling bin (with their permission, of course), poked some holes in the bottom with a nail, and two holes on the side near the top.  i spray painted the outside and inside to pretty them up, and prevent rust.  i looped some coated steel wire though the two holes near the top and hung them on screws on the side of our garage.  i have basil, lobelia, chamomile, and orange mint planted in these four cans.  i have one more can waiting to be painted, and i'm hoping to collect a couple more as well. 

i have a few other vertical growing ideas up my sleeve for later in the summer once things really start growing.  it's just one more way to save space and fit as much as you possibly can in that garden of yours!