Showing posts with label canning. Show all posts

Thursday, July 31, 2014

Concord grape jelly

It's time for canning!
We have been trying to preserve as much as we can as the season is flying by. 
We made some pesto, canned tomatoes, froze some eggplants and for the second year I have been making grape jelly with our Concord grapes. It is pretty simple but it takes a little time and we have so many grapes. I followed this recipe. I had 20 cups of grape juice, I had to cook them in 2 separate pots...
The first batch ended up to be a little too liquidy. The second batch was just perfect !
I just recommend to try it first with a small batch of  grapes to see how it goes, have the experience, test the amount of sugar and pectin.


Wednesday, July 30, 2014

water-bath canning recipe: dilly beans


hello, friends! while we're away soaking up the sunshine at the beach, i wanted to share my dilly beans recipe.

this dilly bean recipe is a staple recipe in our home during the summer months. 


- natalie

Wednesday, July 23, 2014

putting up tomatoes: crockpot tomato base & canned tomato jam


on any given day this week, if you were to walk into my kitchen, you would find tomatoes.

lots of tomatoes.


tomatoes chopped & tomatoes simmering in pots. tomatoes in crockpots & tomatoes roasting in the oven. tomatoes in the freezer & tomatoes put up for the winter.


it's the season of tomatoes & we are oh so thankful for the bounty!


today i want to share with you two new ways i preserve & put up tomatoes for the winter:

1. crockpot tomato base - a simple way to preserve your tomatoes when you're running short on time is to chop them up, skin & all, & place them in the crockpot. i add frozen or fresh basil for flavor. i put the crockpot on high & allow the tomatoes to simmer for around 12 hours. halfway through the cooking process, i remove the lid to allow the liquid to evaporate. once it's formed into a thick tomato base, i add two cups of tomato base to labeled ziplock bags & place them in the freezer. during the winter months, we add tomatoes to soups, chills, crockpot meals & more. this is the perfect base for adding to almost any meal. 


2. tomato jam - tomato jam is a lengthy process, but your home is sure to smell amazing! to make tomato jam, i followed this recipe. for extra flavor, as recommended by a friend, i added a hint of smoked paprika. it is delicious paired with bread & cream cheese!

happy tomato season!

- natalie

Thursday, May 29, 2014

Preserving grape leaves


I wanted to start to say how much it feels good that we have planted most of the plants we wanted to grow this year.  Dan installed his hammock and is ready to enjoy it.


Here is the little bouquet I made this week.


Now I want to share with you how to preserve grape leaves.
At the end of spring or beginning of summer it’s time to prune the grapes and perfect timing to preserve the leaves.
You then we’ll be able to make stuffed grape leaves.


You need to get yourself a lot of leaves, I always try to count and then get lost in the count anyway…

I like to prepare everything I need before cooking or doing anything so here is what you’ll need.

-       grapes leaves
-       sea salt
-       lemons
-       sterilized wide mouth quart jars + the seal  
-       cotton string for cooking
-       boiling water
-       iced water
-       a canner 

So now that you have everything ready on your counter let’s get started.


First give those leaves a good bath to get rid of the dirt, bugs… To be sure it is clean- do it twice.


Remove all stems.

Prepare a pot with boiling water to blanche your leaves and another pot of boiling water to fill the jars later. You have now 2 pots of boiling water on your stove.

Stack the leaves by 12 arrange them by size the biggest first then roll them and attached them with the string.


Then put your leaves into the boiling water for 1 minute, time for them to be blanched.


Remove them and let them cool into iced water.

Take them out of the iced water ( try to get most of the water out )and place them into your sterilized jars ( depending on the size of your leaves you might have to fold them )

Sprinkle a good amount of sea salt on your leaves, here you can choose to put more or less salt depending on your taste. If you add too much salt you might have to wash your leaves once you will want to prepare them.

Add the juice of a lemon per jar then cover with the boiling water you prepared before. Make sure the leaves are covered with water leave at least ½ “ headspace. Add the  sterilized lid, the ring and seal it.

Process in your canner for 20 minutes. ( 20 minutes with boiling water )


Take the jars out of the canner, check if it’s properly sealed and you can store them away and use them when you want it !
You can store them up to a year.


Wednesday, May 8, 2013

strawberry jam recipe


hello! i am here today to share with you my favorite strawberry jam recipe. this is by no means a recipe that is healthy, but my mom & i have made this strawberry jam since i was in high school so it holds dear memories for me. i also don't eat this jam everyday. i gift it to my family during the holidays (my aunt requests it!) & use it as a delicious topping on waffles during our special sunday brunches.

my mom came into town this past weekend & brought along a box of strawberries from my hometown! i've never had a better strawberry. they are truly melt-in-your-mouth amazing. so, with my mom in town & a box of strawberries, there was really not much else to do but can! that we did & i am happy to share with you our recipe. enjoy! 


supplies needed
- canning jars with screw tops & new lids (i prefer smaller jars for jam)
- water bath canner or extra large pot with lid
- large pot
- saucepan
- ladle
-funnel
- clean towels

ingredients
makes about eight 8-ounce jars
- 6 cups granulated sugar
- 8 cups whole strawberries, capped & crushed
- 4 tablespoons lemon juice 
- 1 package (1.75 oz) regular powdered fruit pectin


1. place clean mason jars without lids or screw tops in water bath canner. add cool water to canner until it reaches the rim of the jars. place canner on the stovetop & bring to a simmer. simmer until you are ready to use your jars.

2. place new lids (the flat part of the top) to a saucepan. add about an inch of water. place on stove top over low heat & allow the lids to heat until you are ready to use them.

3. measure exact amount of sugar into a large bowl & set aside.

4. measure exact amount of crushed strawberries & add to large pot. add lemon juice & mix. add pectin & mix until the pectin is dissolved. 

5. bring to a full rolling boil (a boil that does not stop boiling when stirred) on high heat. all at once, add your measured sugar to the large pot. bring your strawberry mixture to a rolling boil once more, stirring constantly.

6. once your strawberry mixture is at a full rolling boil, boil hard, stirring constantly, for 1 minute.

7. remove the pot from heat immediately. skim off foam.

8. remove your jars from the canner, making sure to dump the water back into the canner from the inside of the jar. place warm, empty jars on towel. remove lids from saucepan & place on the towel.

9. carefully fill one jar at a time using your funnel. make sure to fill jar leaving 1/4 in. headspace. wipe off the rim with a clean towel & screw on lid & top to fingertip-tight. place jar in canner & repeat.

10. once all of your jars are in the canner, fill the canner with water until the water is 1 in. above the tallest jar. cover canner & bring to a full rolling boil over high heat. process jars for 10 minutes. 

11. once jars have been processed, wait five minutes. then, remove jars from canner & place on towel for 24 hours. after 24 hours, make sure your jars are sealed.

12. label jars & gift to family or friends! enjoy atop waffles or on a delicious pb&j!


happy canning!

Tuesday, September 27, 2011

home preserving workshop

home preserving class

this week i am preparing for a home preserving & canning workshop that i will teach this saturday in northwest arkansas. ozark folkways is an incredible little place that focuses on most skills forgotten in this age of consumerism & quick fixes. i cannot wait to get all of the students together for a morning of preserving apple butter.

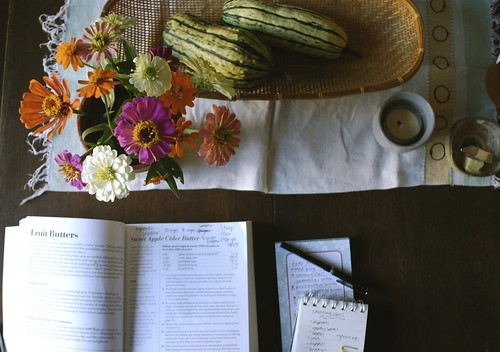
the photo above shows my kitchen table in its current state- little scribbles of to do lists & ideas for the big day. i finally perfected my recipe & i am looking forward to sharing it. i hope to make the kitchen a cozy little space for working, jamming & canning. the students will take home a jar of their own jam & a bag filled with supplies for decorating their jars for the holidays. (i wish you all, each & everyone of you, could be there).

i also plan to pass out a packet of information on my favorite blogs, books & publications.

here are just a few sources i dig:
- putting by
- put 'em up!
- canning for a new generation
- the latest issue of natural home & garden

i must ask- please do share any tips, blogs, books, publications that you find helpful in preserving & canning. i'd love to add them to my growing list of resources! thank you!

Monday, September 12, 2011

speaking of pickles

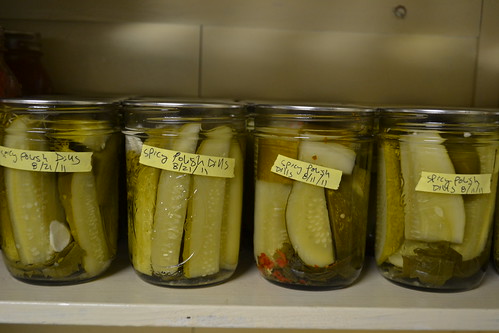
spicy polish dill pickles

after amy's post about pickled peppers on friday, i've been thinking i'd share with you some of my favorite pickle recipes.  let me just start by saying that i love pickles.  seriously love.  give me a jar of sour pickles and i'm set.  in my few years of making pickles, i've mostly stuck with cucumbers, with a slight [and delicious] foray into dilly green beans last year.

my stand-by recipe is for spicy polish dill pickles.  these are the perfect sour dill pickles with the added bonus of a nice spicy kick.  i discovered this recipe a couple of years ago and have adapted it a bit.

spicy polish dills
[adapted from that's my home]

3 1/2 lbs small to medium cucumbers, sliced in quarters [the long way] will make approximately 5 pint jars.  i prefer wide mouth for pickles so the jars are easy to pack.

while you are sterilizing your jars, make the brine.  for 3 1/2 lbs cucumbers, heat up 3 cups water, 1 cup white vinegar, 1/4 cup canning/pickling salt.  heat until just before boiling [so it's bubbling around the edges]

once the jars are sterilized, pack each jar with:
1 grape leaf [this is key to keeping your pickles crunchy]
1 fresh dill head
1 whole jalapeno pepper
1 whole garlic clove
1/4-1/2 tsp. fresh ground black pepper
cucumber slices

pour hot brine over packed jars, leaving 1/2" headspace at the top of the jars.  put on lids and bands and process in boiling water bath for 10 minutes.

refrigerator pickles 
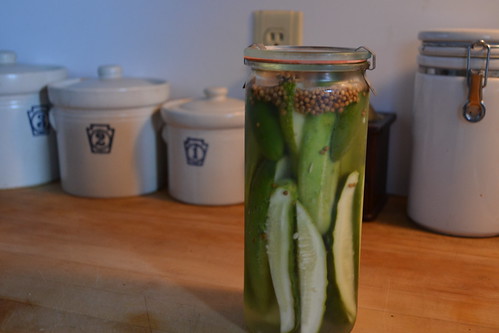
since i had so many cucumbers this year, [after making 3 batches of these pickles] i wanted to try something new.  last week, i made 2 new pickle recipes.  the first was these quick refrigerator pickles.  i'd always avoided refrigerator pickles, thinking they wouldn't be sour enough for me.  i put these together on friday [almost 36 hours ago] and tried one today.  while not as sour as i prefer, they are quite tasty, and definitely not sweet.  i think they'll only get better with time.  [side note: that jar in the top is the only thing i could find to weigh down the cucumbers that would fit within the opening of this half gallon jar.  looks weird, but it works!]

kosher dill pickles 
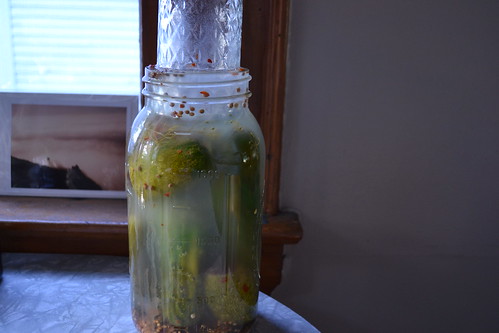
the third batch of pickles i'm currently experimenting with this year are these kosher dills.  i started these on friday evening as well and haven't tried any yet.  i'm going to put them in the fridge tonight and see how they progress.

so, any other favorite pickle recipes out there we should be trying?

Tuesday, August 2, 2011

preserving the harvest


over the last couple of months i have spent hours in the kitchen preserving the harvests of our garden & surrounding farms. freezing pesto, pickling vegetables, making jam & canning tomatoes are among the many tasks on my to do list during the summer months. i particularly enjoy the act of preserving food; i feel a strong connection to the generations before me when i save food for the winter months.

above are several jars of herbed seasoned tomatoes made last night. my recipe came from ball's complete book of home preserving, by far the most helpful source i have found. do you have any sources for home preserving that are particularly helpful (& delicious)? i would really love to hear about your adventures in home preserving.