Friday, June 28, 2013

Embracing My Front Garden

DSC_1534 DSC_1532 DSC_1530 DSC_1529 DSC_1527 DSC_1526 DSC_1525

 You may remember when I first introduced my front garden space and how it had been neglected for some time. Well, I am happy to report that I have been spending most of my time up front this season and giving the space some overdue TLC! Although there is still much more to do (including building the retaining rock wall), I am quite pleased with how things have filled in.

I spent most of the spring improving the soil conditions with a heavy dose of compost which has made a huge improvement in productivity. Like the rest of my garden spaces, I have planted a mixture of ornamental perennials such as Coreopsis, Echinacea, Black Eyed Susans and Spiderwort along with an array of herbs including Sage, Thyme, Comfrey, Borage and Santolina. I made sure to leave room for the annual edibles that thrive in sunny conditions and that we love to eat such as Zucchini, Cherry Tomatoes, Cucumber, Basil, Swiss Chard, Lacianato Kale and a few Watermelon plants. Everything is peeking up through a lush ground cover of Vinca Vine and Creeping Jenny.

 In the past I would look the other way when I walked past the front of my house and only use my back door just to avoid the eye sore of a space. But now the first thing I do in the morning is open my front door to say good morning to my garden.  I greet it with a smile and pull some weeds. I water it's roots and then nibble on some herbs. And sometimes i just sit on my front steps and admire.

Thursday, June 27, 2013

late june blooms

after the long winter, practically non-existent spring, and incredible amount of rain and storms we've been having i feel like i can safely say that summer has finally arrived. and my garden knows it. things are blooming all over the place and today i thought i'd share with you some of my favorite blooms from the gardens at my house...

roses
very pink roses
valerian
valerian, kept getting knocked over by my dog, so it's now in a protective tomato cage. it is resilient!
yarrow
yarrow
clematis & window boxes
clematis and window boxes of pansies, allysum, and dusty miller
tomatoes
mystery cherry tomatoes (from my csa)
borage
borage, on their last blooms already!
chamomile
chamomile, growing in the cracks of my brick pavers. i planted a LOT of chamomile this year. can't wait for tea!  

what's blooming in your garden these days?

Tuesday, June 25, 2013

diy mason bee house

I have a fun, simple project for you this week, and it will most likely cost you nothing, take you just a few minutes to make, and will create habitat for garden pollinators. It’s also an enjoyable way to observe nature at work. With a little pile of scrap wood, we made a few mason bee houses for our garden and yard, and a few to give as gifts as well.

 Mason bees are small, cute, fuzzy little bees that make efficient pollinators in the garden. They can be blue-green, or dark-colored like the one pictured above. This little lady is not the first to make a nest in this hole in our unfinished door frame.

The female mason bee gathers nectar and pollen and stashes it in the back of the hole until there is a sufficient food store for her young. Once there is enough food to supply the larvae, she lays an egg on the food store and then seals it in with a bit of mud. She then brings in more pollen and nectar in front of the previous mud layer, lays another egg, covers it with more mud, and stacks like so until the cavity is full. Once the cavity is full, she seals the hole with a final layer of mud. Maybe you have seen these mud filled holes and wondered what was in there.

Here is a link to more information on mason bees, if you are interested in learning more – http://gardening.wsu.edu/library/inse006/inse006.htm. I think these little bees are pretty fascinating!


We have an endless supply of scrap wood from our various home projects and are always looking for functional ways to use it up. We cleaned up some sections of 4×4, cut an angle at the top to accommodate a little sloped roof, and then drilled 1/4 inch diameter holes in the outer rows and 3/16″ holes down the center. We used all the depth we had in this case, and drilled almost to the back of the 4×4. Typically, larger diameter holes are recommended (5/16″), but maybe our bees here on the coast are pretty small, or maybe they actually prefer smaller than the recommendation. The hole in the door frame is about 1/8 inch, for example.

We used sections of old fence pickets for the roof (not totally necessary, but shelter from rain is nice, right?) and as a backing to make mounting it easy.
Apparently, it is best to hang the house facing east or southeast, for morning sun. The face of that door frame above is pretty much dead south, so a little variation from that recommendation probably won’t break the deal.

I'm looking forward to observing these bees more closely.  We really enjoy creating habitat for beneficial species of all kinds at our place.

How do you invite beneficial insects to your garden?

Monday, June 24, 2013

Garden Reads


It's a great time of the year to sit back a little and watch your garden grow. I have two wonderful gardening books to share with you today.

To Eat: A Country Life by Joe Eck and Wayne Winterrowd
Joe Eck lives and gardens in southern Vermont. I've been lucky enough to visit North Hill and hear Joe and Wayne read from their books at past events.  Sadly, Wayne passed away in 2010 and this was the book he and Joe were working on at the time.

It's a delightful little book filled with short chapters on fruits and vegetables with charming illustrations by Bobbi Angell. I've only just started reading, but I can already tell that it is special. As soon as it arrived in the mail (a gift from my mother), I opened right up to the rhubarb chapter. I love how Eck and Winterrowd braid together history, growing tips, and culinary memories in each chapter. This particular chapter ends with a recipe for Rhubarb Custard Pie. Yes, please.


How To Move Like a Gardener by Deb Soule

Don't you just love that title? If you are interested in herbalism and gardening, there is no better source than Deb Soule. As soon as I heard that Deb was writing a new book, I pre-ordered it from her shop, Avena Botanicals. Deb just has a way about her. She is full of knowledge but humble and kind. The book is filled with gorgeous color photographs and would be a great book to add to your collection if you are interested in learning more about herbs, biodynamic gardening, and medicine making.

Which gardening books will you be reading this summer?


Wednesday, June 19, 2013

u-pick farms and a simple fruit crisp


we recently spent an early morning at a blueberry u-pick farm. this is one of our favorite activities during the summer. we love spending time outdoors together at a local farm, picking gallons of berries to save for smoothies & desserts throughout the year. 


u-pick farms are much more affordable than purchasing a large amount of berries from the grocery store or farmers' market. we usually spend around $13 per gallon on u-pick berries versus the $26 per gallon at the farmers' market. it is also a wonderful activity to do with the entire family! we saw many families at the farm with each child holding a bucket while harvesting handfuls of berries.


when we harvest large amounts of berries, we usually only save a small basket of berries for fresh eating. we typically freeze the bulk of our berries. freezing berries is very simple. once the berries are cleaned, place them in one layer on a cookie sheet. place in the freezer & allow them to completely freeze. add your frozen berries to a plastic freezer bag & continue this process until you have frozen all of your berries! 


we also love a good, somewhat healthy fruit crisp. below is a favorite, simple recipe. you can use whatever berries you have on hand. raspberries, blueberries, blackberries & strawberries are all great choices. for this particular recipe, i used blueberries and strawberries.


simple fruit crisp
adapted from simply in season

6 cups of frozen or fresh berries
3/4 cup whole wheat flour
3/4 cup rolled oats
3 tablespoons coconut oil
2 tablespoons apple sauce
2/3 cup brown sugar
1/3 cup pecans or walnuts

preheat oven to 375F. mix berries together & pour into a deep pie dish. mix flour, rolled oats, coconut oil, applesauce, brown sugar, and nuts in bowl until mixture is crumbly. evenly sprinkle topping over fruit. bake in oven until the top is golden & berries are slightly bubbling, about 30 minutes. it might take a bit longer if fruit is frozen. serves 8.

Tuesday, June 18, 2013

mid june highlights


It's mid June, and the garden spaces are filling in beautifully with all the warmth and moisture. Just a couple weeks ago I'd go out and things would seem slow and sparse (in my idealist view of the fullness that could be), but I realize even now how early it still is, and how much growth is still to come. It's not even summer yet! That makes me sigh with relief. As a gardener, this season can feel all too fleeting.

Summer squash is coming on. This one is Caserta, an heirloom variety from Baker Creek.

 Abundant fresh herbs and their flowers make it into most all of our meals these days.

 New beds are being dug and planted.
 
 Once-weedy, overgrown spaces are becoming beautiful new perennial, edible spaces.

 Tomatoes are growing! The hoop house has really gone wild this week, with visible growth spurts every day.


And flowers are blooming everywhere, bringing so many hummingbirds and the steady buzz of bees.

 There is so much to take in right now. I'm doing my best not to miss any of it.

Monday, June 17, 2013

June


Vermont in June. You can't beat it.

Delicate pink peonies open.
The thimbleberry shrubs are in bloom
Wild strawberries are growing in the field.
Garlic scapes begin to form.
Lettuce is abundant as are the weeds.
Beets are thinned and added to the latest salad creation.
Our sage plant is in flower.
The hops are growing up their string supports.
The dahlias and glads are poking up from the soil.
The lady's mantle has a spray of golden flowers.
The lemon balm and oregano are ready to be trimmed and used in the kitchen.
Tomatoes need to have their suckers pinched.


So much to do, but I love every minute of it.

I'll be back next week with a new book I think you'll enjoy.

Friday, June 14, 2013

beauty in the shade garden.

DSC_1394
as i have written here before, our garden  recieves mostly northern exposure which leaves us with part sun in some areas of our garden and very shady conditions in others.
but i have come to really appreciate the many beautiful specimens that prefer low light.

i love  silver, grey, purples and blue-green hues in the garden. i am also attracted to plants with interesting leaf shapes and patterns with variegation and texture. i don't believe a plant needs to have a fancy flower to be beautiful. i thought i might share just a few of my favorite plants whose leaves bring beauty to the shady spots in my garden. there are so many more that i will save for another post.

DSC_1398
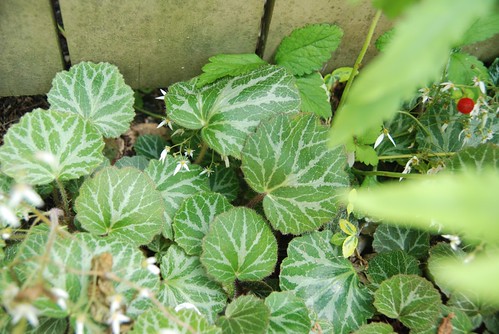
 one of my favorite shade loving ground covers is strawberry begonia. mostly known as a houseplant, this little beauty does best outdoors and loves spreading it's roots in shady conditions. it spreads rapidly but is not invasive as it is shallow rooted and easy to dig up. i transplanted a very small amount of these from my mothers garden last summer and they are spreading beautifully in the garden and in the cracks of our rock walls. i also have it growing in pots, planters and in my window boxes as well as in the living roof atop the bunny hutch. i recently found out that strawberry begonias are a japanese delicacy and are also used for medicinal purposes. extracts from the plant are promised to reduce wrinkles and improve the skin. i may have to look more into that! overall i just love it's little scalloped, variegated leaves and dainty white flowers. a must have in the shade garden! DSC_1395
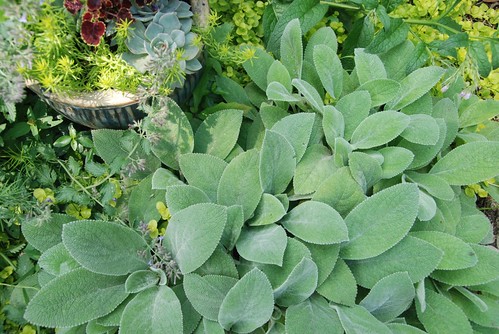
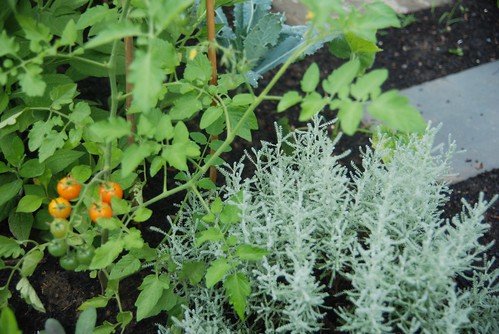
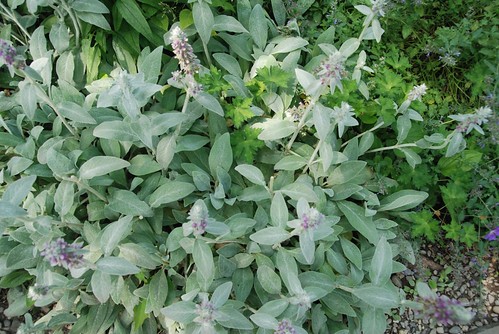
the velvety grey leaves of the stachys plants are a stunning addition to any garden adding texture and character. they spread rapidly, making them effective ground covers and are drought tolerant and also deer resistant. you can't help but want to reach out and touch this tempting plant. i often find my girls and their neighbor friends stooping down to stroke it's soft leaves also know as "lambs ears".

 DSC_1400
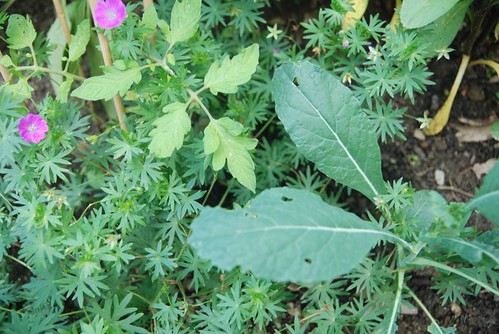
 i know i have raved about lacianato kale here before but i can't stress enough how beautiful this plant is. i love it's bumpy "dinosaur" textured leaf and it's majestic presence in the garden. and what's even better is it's edible and yes it grows in part shade! once you grow lacianato also known as tuscan kale
you may not want to grow any other variety. it is resilient and a very productive plant for the small garden and can reach up to three feet tall. it produces all summer long well into the winter months. i have harvested kale with snow on the ground and it just gets sweeter. grow this in your garden. you won't be sorry.  
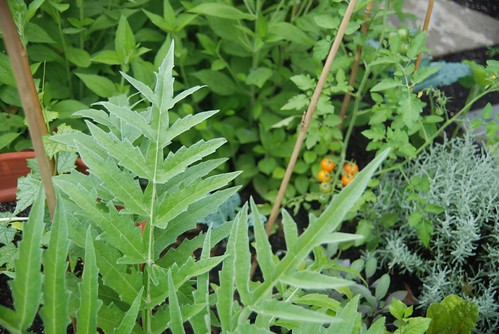
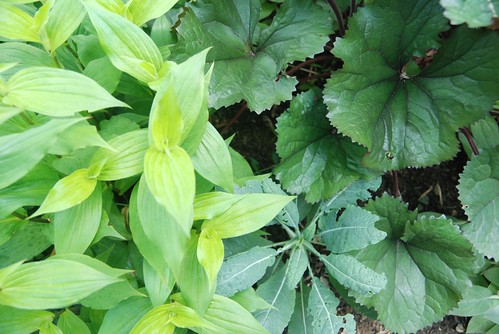
DSC_1402
ligularia is another favorite of mine which makes a big statement in the garden with it's dark bold  leaves and deep purple veins and stems. i also have a purple leaved variety which is stunning. it does put out a pretty little spike of a yellow flower but i love the leathery almost heart shaped leaf even more. it does prefer a deep, rich, moist soil and is deer resistant. it is a nice contrast in the garden. DSC_1399
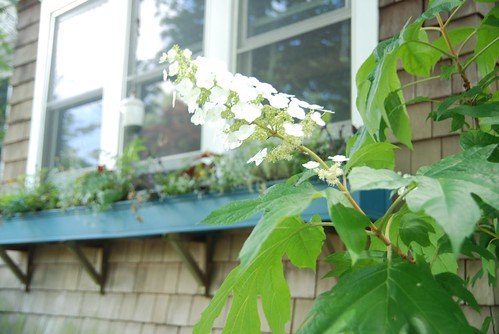
if you are thinking of planting a hydrandea in your garden i can not recommend enough the oakleaf hydrangea. not only does it produce a beautiful cluster of creamy white flowers but the leaves of this shrub resemble very much a large oak leaf with silvery white undersides. hydrangea quercifolia turns a bronzy purple in autumn with dried flower heads. it does well in deep shade and makes a lovely cut flower.
DSC_1404 these are just a few. stay tuned for more favorites. i would love to hear some of yours.

Tuesday, June 11, 2013

hand pollination in a hoop house


This spring I was feeling bold, and planted four melon vines, which is more than I have ever attempted to grow, despite having had no real success in past years with this heat loving fruit. Our coastal summers are relatively cool, and though this melon variety is known to be cold tolerant, they haven't thrived out in my garden; so this year I've put them in the hoophouse. The only problem with this is not many pollinators make it into the hoophouse, so I knew I'd have to attempt pollination myself. I have been patiently waiting for female flowers to join the many male flowers that have been blooming, and over the last 3 days, the first 3 have finally opened!


At the same time I discovered the first female flower, I noticed a small pile of jute rope sitting near the plant. It seemed like it would make the perfect little brush. I cut a short section and separated out a small bundle of the fibers.


Above is a male flower. Notice the simple flower base sitting on the stem.


 I rubbed the stamen - the parts inside the male flower which are covered in pollen - with my little brush,


and then I brought it to a female flower. Notice the bulge of what looks like a tiny fruit under the flower. That bulge is the easiest way to identify a female melon flower.


  Here is the inside of the female flower, looking ready to receive pollen.


I brushed the pollen I collected from the male flower into the pistil of the female flower, repeating the process a number of times, visiting different male flowers - somewhat like a bee might do, buzzing from flower to flower. Hopefully I will have been successful, and my vines will set some fruit!

Has anyone tried hand pollination? How did it go?
I find the whole sexual anatomy of plants so fascinating. It's amazing how perfectly equipped each life form is, to perpetuate itself.